
We really like the legendary Discovery Channel documentary series "How It's Made." And we think that if the general public knew how a shoe is made, they would be fascinated by this essential piece of textile.
You know? It's been two years since we embarked on this venture, and we still feel like we still have a lot to learn about the world of footwear manufacturing. Creating a shoe is far more complex than we could have ever imagined before starting out. And, honestly, once we've thought about it, raising awareness of this wonderful complexity, whether through schools or specialized marketing publications, would benefit everyone: consumers would have more information, companies would gain greater appreciation from an informed public, and schools would have more motivated students studying the trades. We'll leave it there for those who want to pay more attention. We, in principle, are doing our part with this article, explaining how a shoe is made.
Shall we begin? We're sure that after learning the whole process, you'll never look at your shoes the same way again. What do you want to bet?
Well, let's start from the beginning!
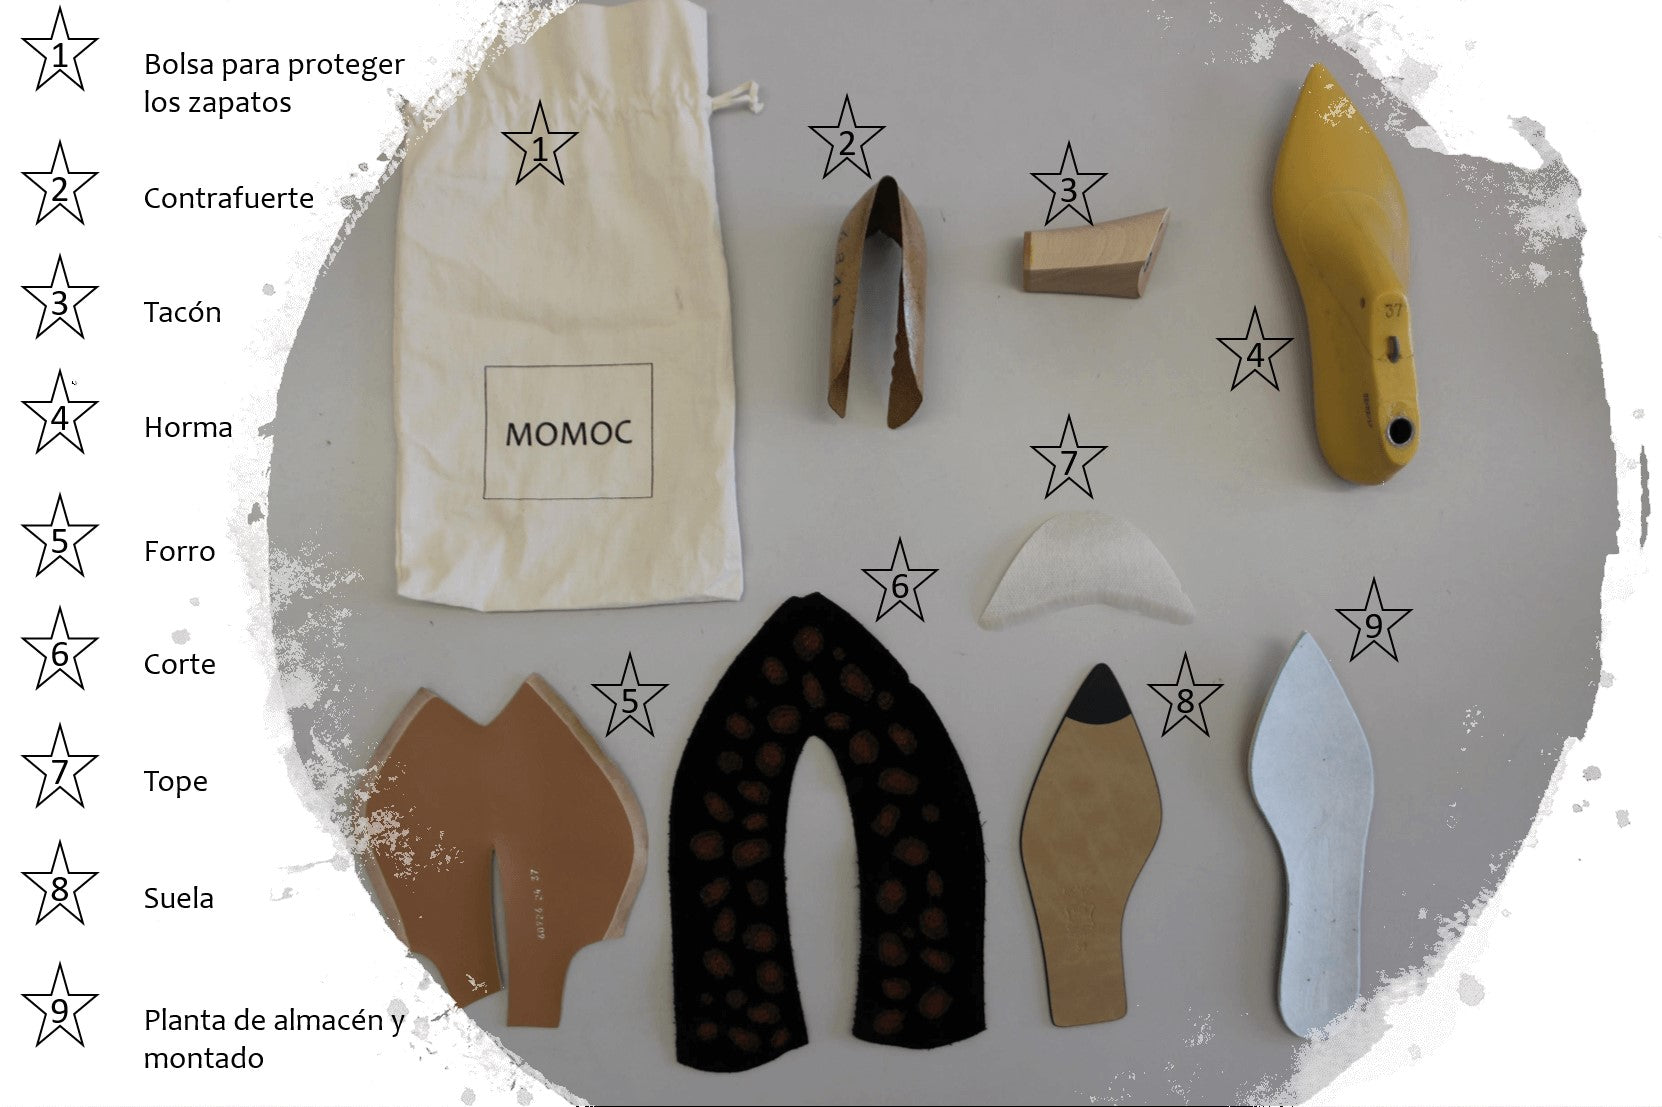
These are the 10 basic pieces that make up a shoe, not counting any decorations or ornaments, of course:
- Court
- Lining
- Sweaty
- Template (or warehouse floor)
- Assembly plant (under the template)
- Stop
- Buttress
- Last
- Sole
- Heel
Well, to start and give you a general idea of the process: each piece is made by a different supplier. So imagine the complexity this entails when coordinating the assembly line. If a single supplier doesn't arrive on time, the shoe can't be manufactured.
Below we list the steps involved in manufacturing. A different person is involved in each step. In total, at least nine people are involved in the manual production of footwear.
Let's go!
First: we create the design
And the pattern maker adjusts it to the chosen last. We create the original pattern on a sample, usually a size 37. Once the pattern's validity is confirmed, we prepare the scales to develop the remaining sizing.
Second: we prepare the cut, the lining and the sweat
This work requires special attention and precision. These three details define the client's final experience, whether by coming into direct contact with the skin or by facilitating a specific sensation when walking.
Third: we fix the shoe
We sew the three elements mentioned in the previous step (upper, lining, and sweatband). Optimal stitching will ensure maximum durability for each piece, so this is also a very important step.
Fourth: we baste
We glue the previously sewn lining and upper together, forming the overshoe. The heel counter and toe cap, which give the shoe its shape (the back and front parts, respectively), are placed between the upper and the lining. At this point, the shoe begins to take on its identity.
Fifth: we cut the insole adjusting it to the shape of the last
And we've just finished highlighting the identity of our shoes by stamping the brand logo! Some brands put their logo on fabric and then sew or glue it to the insole. At Momoc, for sustainability reasons, we stamp the logo directly onto the insole, thus using less material and, therefore, generating less waste.
Sixth: we place the assembly plant
It's the element just below the insole. Sometimes its edges need to be covered so they're not visible. For example, in this model The Burgundy Mouette from our BURGUNDY collection, the edges are lined with white leather.
Once the previous six steps are completed, our shoes move on to the assembly line!
In this part of the process, the mounting sole is placed on the sole of the last, followed by the overshoe, which is adjusted so that the overshoe fits the shape of the last. The sole is then re-bent, that is, marked to indicate the areas that need to be sanded. The next step is sanding, and the sole is immediately glued on.
We're almost ready to ship the shoes to the warehouse!
Only the last three steps of the assembly line remain: we remove the shoe from the last, screw on the heel, and glue on the insole.
Now yes... To the warehouse!
During the warehouse phase, we thoroughly wash each shoe. We leave them perfect so you can enjoy original designs, pampered from the very first moment. We choose national suppliers who love the world of footwear, and it shows.
Finally we pack!
We wrap each pair of Momocs in recycled tissue paper and place them in our eco-friendly cotton bags, ready to delight your everyday!
Want to know more?
In the following video we show you how to assemble the sandal. Saber : Behind the scenes . Enjoy!
Write to us at momoc@momocshoes.com to suggest a topic about sustainability and sustainable living that you're interested in learning more about. If you'd like to stay up to date with our monthly publications, subscribe to our newsletter! blog !
A big hug and see you next time.